Showing posts with label Desserts. Show all posts

Friday, April 22, 2011

Carrot Cake

I love making carrot cakes! I found a recipe a few years ago, and since then I have modified it. The recipe I use now is one that I have changed and made my own.

I consider myself a carrot-cake-converter...if you have never heard of such a person, let me explain...I convert people to lovers of carrot cakes. A lot of people I have met say that they do not like carrot cakes. I am not sure if this is because they have had bad carrot cakes in the past or maybe the thought of actual carrots in a baked good weirds them out....who knows....

...I do know that once these people try my cake, their minds are changed! I convert them! Hence the name: Carrot-Cake-Converter.

Here goes the recipe:

Begin by putting peeled, washed, and chopped carrots into a food processor. (Back when I first began making this cake, I used to grate the carrots by hand! I would not recommend that unless you want orange fingers, little cuts from the grater, and a sore hand. But, if you do not own a food processor, you will have to use a grater.) 

You want 2 cups of carrots. This usually takes about 4-5 large carrots. Again, I am the worst at measuring so you will have to try it and see. 


 The carrots should look like this after they are processed. 

 Next, add half a can of crushed pineapple (without the juice) and 1 individual cup of cinnamon apple sauce to the food processer. Process this until mixed well. 

One way to lessen the calories in baked goods is to use apple sauce in place of oil. I do not completely cut out the oil from this cake, but I use less. I also find that apple sauce adds moisture. 

When using apple sauce, it is easiest to use individual cups, because 1 of these cups is equal to 1/2 a cup of oil. 

I also use the cinnamon kind, because I am a cinnamon fanatic. If you are not too keen on cinnamon, use the normal kind. 

 Once you have processed the apple sauce and the pineapple, add it to carrots. Next add 4 eggs. 

 After you mix in the eggs, add 1 cup of vegetable oil. 
Next add 1 teaspoon of nutmeg and 1 tablespoon of cinnamon (I told you I was a cinnamon fanatic!) Again, if you do not like cinnamon as much as I do, add less. 

 Next add 2 cups of sugar. 

 Lastly add the dry ingredients. 
In a seperate bowl, mix together 2 cups of flour, 1 teaspoon of salt, 2 teaspoons of baking powder, and 2 teaspoons of baking soda. 

Add the dry ingredients and use a hand mixer to thoroughly combine. 

Once mixed, pour half the batter into a round pan (that has already been thoroughly greased and dusted with flour). You wil need two round pans that are the same size for this recipe. If you do not have two of the same pans, you will have to bake one cake and then the other using the same pan. 

Half the batter will be used in one cake and half in the other. You want to end up with two identical cakes that will be stacked on top of each other. 

Bake the cakes at 350 degrees for approximately 20 minutes or until the tops are set and a tooth pick inserted into the middle comes out clean. 

Once the cakes are done, run a knife along the edges. Then let stand until completely cool. 

After the cakes are cooled, place one cake on a platter. Spread cream cheese frosting generously on the top. Then top with the second cake. Ice the entire cake with cream cheese frosting. Last, cover the sides with chopped walnuts. 


Carrot Cake

Ingredients:
2 cups finely grated carrots
1 individual cup cinnamon apple sauce
4 eggs
1/2 can of diced pineapple
1 cup vegetable oil
1 tbsp cinnamon 
1 tsp nutmeg
2 cups sugar
2 cups flour
1 tsp salt
2 tsps baking powder
2 tsps baking soda
Chopped walnuts


Sunday, April 10, 2011

Teacup Cake

You read in my last post that we were celebrating my Mumma's (I call my mom that) 50th birthday. In honor of that I made her a cake from scratch. I love to bake and I am pretty well-known for my carrot cake.  My mom requested a carrot cake so that is what I made. But I did not make the cake the classic way, I made it into a teacup shape! Mumma and I love drinking tea, and we visit my Auntie Donna once a week to have tea with her. My Auntie Donna and I threw the party together so I thought the teacup was very fitting.

In this post, I will give the recipe for buttercream frosting, which I used on the cake. I will also feature photos of the cake. In a later post, I will feature the carrot cake recipe with the classic look.

To make the buttercream, I used the Wilton's recipe, which can be found online on their website.


I got to use a Kitchen Aid stand mixer for this! I was in heaven!! If any of you want to buy me one, I will love you forever!! Okay now to the recipe! 
Begin by beating 1 cup of vegetable shortening. If you do not have a stand mixer, a hand mixer will work as well.


Next, add 1 cup of butter (2 sticks). Mix until smooth. 


Next add in 4 tablespoons of milk and 2 teaspoons of vanilla extract. 


Next, add in the powdered sugar. I am doubling the recipe in this post, so you need to add 8 cups of powdered sugar. Add it in 1 cup at a time! 

Watch this video to find out why! 

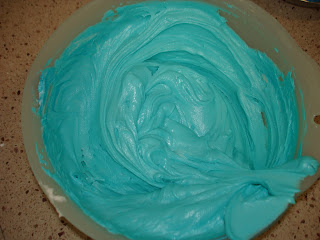
 The icing should look like this when it is done. It should be smooth with no lumps!


Next I took part of the buttercream and dyed it with royal blue dye. Add a bit at a time and mix.


After it was all mixed, it was this color. Remember: if you add a lot of dye to make a dark color, the people who eat it may have their mouths dyed that color!


The other half of the buttercream I dyed sky blue.
Here is the finished product:

 I bought sugar pearls and put them on one by one with tweezers. It was a process, but alhamdulillah, in the end my mom loved the cake! It was worth it! 

Happy Birthday!!!

Saturday, February 12, 2011

Jammies!!

Last weekend my mother and I were driving home from Sunday breakfast at my uncle's house when we saw a sign for a farmer's market in our neighborhood. We were both kind of skeptical, because we had never heard about a market in our neighborhood in the 6 years we have lived in our house, and also because it is February in Massachusetts! What kind of produce grows locally at this time of year?! Despite our skepticism, we decided to follow the signs to the local garden center and investigate.

We walked into a little indoor store, which we never knew existed, and saw a market. But much like I expected, no fresh produce. There were tables set up with different people selling things like granola, decorated cookies, spices, cheeses, and JAM! You may be wondering why I wrote the word jam in capital letters...well, let me tell you... I recently found a recipe for little jam filled heart cookies that I wanted to try out, and I had found one of the key ingredients! I did have regular, brand name jam in my refrigerator at home, but the delicious, real fruit taste of this homemade jam was too good to pass up.

I decided to buy the sugar free strawberry jam, because it was extremely sweet, fresh, and tasted like real strawberries.

Here is the jam I bought:
This jam was delicious! If you would like to buy some, follow the web address on the jar! The company is out of Plymouth, MA. 

I paid my 5 dollars and clutched my jam tightly the whole way home. I have never been more excited to buy a jar of jam in my life! The jam sat on my counter all week just waiting to be used in the delicious cookies, and today it finally fulfilled its destiny.

In the cookbook I have, the cookies are called Jammie Bodgers, but I hate that name. I have never heard the word bodger in my life, so I decided to cut it out and just call them Jammies! The word jammies reminds me of my mom, because that is what she calls pajamas. So this new name makes me happy =)

So here you go: Jammies!

Dice up 3/4 cup of unsalted butter (1 and 1/2 sticks). 

Add the butter to 2 cups of flour in a food processor. Pulse until the mixture resembles breadcrumbs. 
Then add 1 egg yolk and 2/3 cup sugar. Process until this resembles a dough. 

If you do not know how to separate an egg yolk from the white, watch this video to learn! 


Here is what the dough should look like! 
After the mixture resembles a dough, dump it onto a lightly floured surface and knead until it forms a dough ball. 

Cover the dough ball in plastic wrap and refrigerate for at least 30 minutes. 

 After 30 minutes, remove the dough from the fridge. Roll out on a lightly floured surface until it is all one thickness. Then use whatever cookie cutter you would like. I wanted circular cookies, but do not own a circular cookie cutter, so I used the top of the the cup in the picture. It worked wonderfully! 
Once you cut out all the cookies, remove the surrounding dough carefully. 

Then use a smaller cookie cutter to punch a design in the center of half of the cookies. In honor of Valentine's Day (which is on Monday), I decided to use a heart. Once the heart is cutout, carefully use either a spatula or a dough cutter (which I used) to remove the pieces from each other. 

You will need an even number of cookies, half with hearts cut out and half that are complete. You will be making sandwiches, so you need a mate for each cookie. 
Place all the cookies on an un-greased cookie sheet and bake at 350 degrees for about 10 minutes. You want the tops to be slightly golden. 

Remove the cookies from the oven and let cool. They should look like the ones below. 

 I made very large cookies, so I only had 6 sandwiches total. (12 sides + 1 extra that we ate by itself). If you made smaller cookies, like the recipe said to, you would have many more cookies. 

Once the cookies are completely cooled, you can assemble them. Make sure you let them cool, because if you do not, the frosting will melt and make a big mess! 

While you are waiting for the cookies to cool, you can make the buttercream icing! 
In a bowl, mix 1/4 cup unsalted butter (1/2 a stick), 1 cup powdered sugar (also called confectioners' sugar), 1/2 teaspoon pure vanilla extract, and 1 tablespoon of milk. With a hand mixer, mix until it looks like icing. That's it! The buttercream icing is done and you're ready to assemble your cookies!

Begin by frosting the sides without the hearts cut out. You should completely cover the inside of the cookie in buttercream. (Remember you are making sandwiches, so don't frost the tops!)

Next, place about one spoonful of jam on the cookie. Spread out until it covers the entire inside of the cookie. 

Last, place the other cookie on top and press down lightly. There you go, your jammy is done! 
Let sit for about 30-45 minutes to let the jam set a bit. 


The cookies were delicious! The combination of the lightly sweet cookie, the fruity jam, and the buttercream icing is perfect! 

I brought each of my 3 cousins a cookie to try, and with full mouths, they all gave me overwhelming approval! It sounded something like "mmm....so good....mmmm" =) 

Jammies (Written Recipe) 
Ingredients: 

Cookie Dough: 
2 cups flour
3/4 cup unsalted butter
2/3 cup sugar
1 egg yolk

Buttercream Icing: 
1/4 cup unsalted butter
1 cup powdered sugar (confectioners' sugar)
1/2 teaspoon pure vanilla extract
1 tablespoon milk 

Filling: 
Strawberry Jam 

1. Put the flour and butter in a food process. Process until it resembles bread crumbs. Then add the egg yolk and the sugar. Process until it resembles a dough. 
2. Dump the dough onto a floured surface and knead into a ball. Cover the ball with plastic wrap and let sit for at least 30 minutes in the refrigerator. 
3. After 30 minutes, remove and place on a lightly floured surface. Roll out until the dough is all one thickness. Use a cookie cutter to cut out 12 cookies (more if your cutter is smaller than mine was). Use a different cookie cutter to punch out shapes in the center of half of the cookies. 
4. Carefully place all the cookies onto cookie sheets and bake at 350 degrees for about 10 minutes or until the tops look slightly golden. Then remove from the oven and let cool. 
5. Combine all the ingredients for the buttercream in a bowl. Use a hand mixer to mix until it looks like frosting. 
6. Once cookies are cool, assemble. Frost the halves that do not have shape punched out. Then place 1 spoonful of jam in the center. Top with the other cookie (with the shape punched out). Press down lightly. Let sit for 30-45 minutes. Then enjoy!

Thursday, February 10, 2011

Fruit Tart


I have always loved fruit tarts! A fruit tart is a really balanced dessert, featuring a sweet cookie-like crust, a vanilla custard, and succulent fresh fruit. And it must be healthy....it's covered in fruit, and fruit is healthy! (I am going to continue telling myself this!)

I decided to make this after seeing it in a baking cookbook I own. I made it for Heba, my coworker's birthday. I work in an elementary school, and for each teacher's birthday we all do something special to celebrate. So in honor of our preschool teacher, I made this tart.

It may seem like a lot of steps, but just give yourself some time and take it slow =)

I began by making the pastry crust. Begin by preheating your oven to 400 degrees. Then sift together 1 1/2 cups flour and 1/8 teaspoon salt. You sift flour to put air into it and to remove any lumps. This makes your baked goods lighter and fluffier. Once you have sifted these together, set the bowl aside.

 In a different bowl beat together a 1/2 cup of unsalted butter (which is 1 whole stick) and 1/4 of a cup of sugar. I used a hand mixer to do this. You should mix until it becomes fluffy.

 Then add 1 beaten egg to the butter and sugar mixture. Mix this only until combined. 

Now add the flour you have already sifted to the egg, butter, and sugar mixture. Work to combine this until it forms a ball. Be careful not to over mix!

Flatten your dough ball into a disk, cover with plastic wrap, and put in the refrigerator for 20 minutes. 

After 20 minutes, take it out of the fridge and roll it out on a floured surface. Rotate and flip every now and then to prevent it from sticking. When you roll out dough, you should do so from the center outward to get uniform thickness and shape. 


Turn your tart pan over above the dough to measure what size you will need. Your dough should be an inch wider on all sides of the pan.


Put the dough into the tart pan and press into the sides to fit. Remove any excess dough. Then use a fork to prick holes in the bottom. (This lets steam escape when it is cooking, so your tart doesn't get bubbles.) Cover with plastic wrap and refrigerate for 20 more minutes.

Take it out of the fridge, and then here is a weird step to me, but the recipe said to do it, so I did. You need to cover the pastry dough with aluminum foil and fill it with either pie weights or beans. I do not own pie weights, but I had lentils...so that is what I used. The recipe didn't given any explanation, but I am assuming that you do this so the middle doesn't rise up...It looks funny to me though!


Bake at 400 for approximately 25 minutes or until it is slightly brown. Remove from the oven and let cool.

Now for the pastry cream! This has a few steps that you kind of have to do simultaneously, so be organized!

Begin by sifting together 1/8 of a cup of flour and 2 tablespoons of cornstarch. Set this aside. 

Bring 1 1/4 cup of milk and 1 teaspoon of pure vanilla extract to a boil over medium heat. Make sure you watch this! Milk boils over very quickly! 

While the milk is coming to a boil (remember to keep an eye on it!), mix together 1/4 cup of sugar and 3 egg yolks with a spoon. Make sure not to let this sit, because pieces of egg may begin to form. Once this is mixed completely, add the flour and cornstarch mixture. Combine until you have a paste.

After the milk comes to a boil, remove from the heat and add slowly to the egg mixture. Whisk constantly to prevent curdling! 

Pour the cream back into the sauce pan and whisk constantly until it thickens! 

When it has thickened, pour into a clean bowl and immediately cover with plastic wrap. Place in the refrigerator to cool and set. 

Almost done! 

To make the glaze, put a 1/2 cup of apricot jam and 1 tablespoon of water into a sauce pan. Simmer on medium until it thins out to a syrupy consistency. Turn off heat and remove any chunks. 

Now it is time to assemble!! You can use any kind of fruit you want. I used strawberries, kiwis, and blueberries. 

First remove the tart from the fluted sides of the pan. Place your hand under the pan, touching only the removable bottom not the sides. Gently push the tart straight up, away from the sides. The fluted tart ring will fall away and slide down your arm. If you want to remove the bottom of the pan, run a knife or thin metal spatula between the crust and metal bottom, then slide the tart onto a cardboard cake round.

Next fill with the pastry cream. When I make this tart agin, I will double the amount of cream. So if you like cream, like I do, double it!!

Once the tart is filled, begin putting the fruit on. You can put it any design you would like! 
  When all the fruit is on, brush the apricot glaze on. You want to cover the entire tart. The glaze will make your fruit look shiny and delicious! 

Here is my finished tart!! It was delicious! I brought it to work and it was a big hit! 


Fruit Tart (Written Recipe)
Ingredients:


     Sweet Pastry Crust: 
     1 1/2 cups  all purpose flour
      1/8 teaspoon salt
      1/2 cup unsalted butter
      1/4 cup granulated white sugar
      1 large egg, lightly beaten


     Pastry Cream: 
     1 1/4 cups milk
     1 teaspoon pure vanilla extract
     3 large egg yolks
     1/4 cup granulated white sugar
     1/8 cup all-purpose flour
     2 tablespoons cornstarch 

     Apricot Glaze:
     1/2 cup apricot jam or preserves
     1 tablespoon water 

     Topping:
     Any fruit you want! (I used strawberries, kiwi, and blueberries)